


In this series, we're going to build a full-stack web application using the Flask framework. Here is a summary of what we will be covering in this series:
- Installing and building a basic Flask server.
- Different ways to respond to HTTP requests.
- Explore the Jinja templating engine and the features it provides.
- Model-Template-View pattern in Flask (aka MVC).
- Working with forms and redirects.
- And much more...
Are you ready? Let's dive right in!
What is Flask?
Flask is a lightweight WSGI web application framework. It is designed to make getting started quick and easy, with the ability to scale up to complex applications. It began as a simple wrapper around Werkzeug and Jinja and has become one of the most popular Python web application frameworks.
The Pallets Projects
Flask is a Python micro web framework. It is classified as a microframework because it is not opinionated, and it doesn't come fully loaded with particular tools and libraries that you're forced to use. Instead, it lets you choose the libraries you want to use to solve specific problems within your application. This approach is very different from battery-included, monolithic frameworks, such as Django, that come with tons of pre-selected libraries and modules that deal with various features of your application like database interface, authentication, email, etc...
Prepare our dev environment
Before we create our first Flask server, we need to install Flask. We could use the default Python packages folder, which is available globally in your system. But instead, we are going to take advantage of the virtual environment provided by Python! This will allow us to create specific dependencies and versions for each of our projects.
First, let's create and activate our environment:
$ mkdir flask_app
$ cd flask_app
$ python -m venv venv
$ source venv/bin/activate
Our project folder is now locked to the specific version of python we used when we set our environment and will have its own packages locally.
Note: To avoid typing these commands every time you start a new Flask project. We can use aliases! Check out this post to learn more on how to use them.
Next, we are going to install Flask:
$ pip install flask
And that's it! Now we have our environment set up and ready to create our first Flask app.
Open the flask_app directory in your favorite code editor. Create a file in the root directory, and we will name it app.py as a convention, with the following code:
from flask import Flask

app = Flask(__name__)

@app.route('/')
def home_page():
    return 'Welcome to Flask!'

if __name__ == '__main__':
    app.run()
Let's go over what we did here. First, we import the Flask class from the flask module, and we use the Flask class to create an instance that will run our app.
Then, we create our Flask application instance by passing in __name__ as an argument and assign it to the variable named app. Now, you're probably wondering what is this __name__ is all about? What does it do? It's a little bit unnecessarily confusing, but we will explore it later in this post.
@app.route('/')
def home_page():
    return 'Welcome to Flask!'
This is the interesting part; Using the '@app.route ' decorator, we turned our ordinary function home_page into a Flask's "View function". Our route decorator listens to "get" requests by default. But we can also explicitly define the HTTP method we want to listen to @app.route('/', methods=["GET"]).
Want to learn more about decorators? Here is a good article about it https://www.programiz.com/python-programming/decorator
The first argument passed to "route" is the path; in our case, we are responding to root path "/".
To summarize, Our "home_page" function is now handling GET requests coming in at "/" and responding with a simple text "Welcome to Flask!".
Let's try it out!
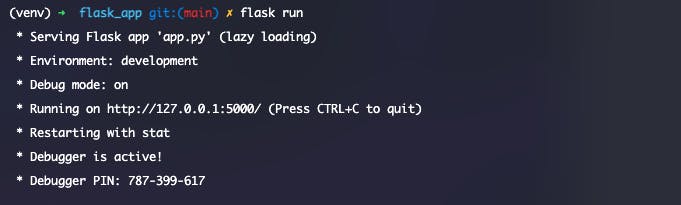
Make sure we are in our app directory "flask_app", and run the following commands:
$ export FLASK_APP=app.py
$ export FLASK_ENV=development
$ flask run
We are setting up some environment variables and run our app.
Note: If you are using windows replace "export" with "set".
Open your browser at HTTP://127.0.0.1:5000
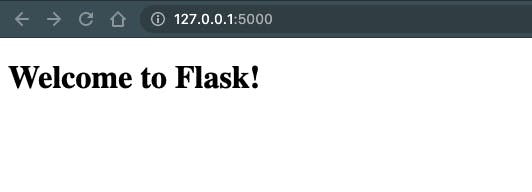
Yay! we have just made our first Flask web app. And that's all it takes to run a Flask web server and start listening to incoming requests.
But wait! What about the __name__ thing? Glad you asked.
In short, __name__ is a special keyword in python. Python sets the __name__ at run time to a value that varies depending on how you're running your app. In our case, it will be app since our file is named app.py, and we are running it using the flask run command. Flask then uses this to access additional files needed by the application, such as static and template files, and we will explore these kinds of files later in the series.
You also have noticed that mysterious condition at the bottom of our file. Remember our __name__ special variable we just mentioned a few seconds ago. When our app.py file is executed directly by python app.py, Python will assign "main" to the variable __name__, and when that happens, we want to make sure that we run our app app.run(). If the script is imported from another script, it keeps its name (e.g., app.py) and won't run our app.
If you want to get an in-depth understanding of how it works, check out this article https://blog.miguelgrinberg.com/post/why-do-we-pass-name-to-the-flask-class
That is it for our first part of the Full-stack with Flask series. I hope you've enjoyed it and I'll see you in the next part. Keep learning and keep practicing.